Backpacking Gear NOT Worth It (Don’t Waste Your Money!)

Backpacking gear is supposed to make life on the trail easier. But not everything lives up to the hype. Some gear is overpriced, fragile, or downright useless. And the worst part? You don’t realize it until you’re miles from the nearest road, carrying a piece of gear that’s more trouble than it’s worth.
If you’re looking to avoid wasted money and pack weight, skip these overrated pieces of backpacking gear—and go with something better instead.
📺 Prefer to watch? Check out my full YouTube breakdown here: https://youtu.be/ZpKoo3WHUpo
A well-packed backpack is a balance of weight, durability, and function. Some gear is worth every ounce, while other items end up being dead weight. Whether it’s fragile ultralight materials, overcomplicated hydration systems, or just flat-out bad design, these are the pieces of gear that don’t belong in your pack.
If you’re trying to dial in your setup, grab my Free Backpacking Gear Checklist—it’ll help you avoid these common gear mistakes.
Disclosure: This post contains affiliate links. As an Amazon Associate, I earn from qualifying purchases. I only recommend products I use and trust.
Dyneema Tents & Tarps – Ultralight, Overpriced, and Not for Everyone

Why Dyneema Isn’t Always the Best Choice
For years, Dyneema has been marketed as the ultimate ultralight shelter material—waterproof, crazy light, and incredibly strong for its weight. If you only look at the specs, it seems unbeatable.
But here’s what the gear shops won’t tell you: Dyneema has some serious downsides that can make it a poor choice for many hikers.
Terrible Abrasion Resistance
Dyneema is strong, but it doesn’t handle wear and tear well. Unlike silnylon or silpoly, which stretch and flex with movement, Dyneema is rigid. That means sharp rocks, tree branches, and even rough ground can wear holes into it much faster than traditional tent fabrics.

Ever seen an older Dyneema tent? Look closely, and you’ll notice the pinholes that develop over time—especially in high-stress areas like tent floors and ridgelines. Once those holes start forming, there’s no easy way to fix them.
Zero Give in High Winds
One of Dyneema’s biggest weaknesses is its lack of stretch.
- Silnylon and silpoly tents flex in the wind, absorbing strong gusts. This helps prevent catastrophic failures.
- Dyneema doesn’t stretch at all. If you pitch it too tight and a storm rolls in, something has to give. Usually, that means:
- A snapped guyline
- A ripped stake loop
- Or, worst case, a torn tent panel
If you’ve ever woken up to a collapsed tent in a rainstorm, you know how bad this can get.
Hot in Summer, Cold in Winter
Dyneema’s reflective surface traps heat inside—which sounds great until you try sleeping in a Dyneema tent on a warm summer night.
- In hot weather? Your tent turns into an oven. Expect to wake up sweating before sunrise.
- In cold weather? Dyneema doesn’t insulate well, meaning you’ll lose heat faster compared to silnylon or silpoly.
If you hike in varied conditions, this can be a dealbreaker.
The Price is Insane
Let’s talk about cost. A Dyneema tent will run you $600+, while a comparable silnylon or silpoly tent offers better durability at half the price or less.
For example:
- Zpacks Duplex (Dyneema) → $699
- Big Agnes Copper Spur HV UL2 (Silnylon) → ~$500 (on Amazon – often on sale for less)
- Durston X-Mid (Silpoly) → $240
Unless you’re an ultralight purist with an unlimited budget, there are smarter, more affordable choices.
Better Alternatives for Budget and Durability
If you want a solid, lightweight tent without Dyneema’s durability issues, check out these top picks:
- Big Agnes Copper Spur HV UL2 – A fully freestanding tent with great ventilation, livability, and durability. Unlike Dyneema, it won’t tear under tension, and it packs down small.
- Durston X-Mid 1 or 2 – One of the best trekking pole tents for the price. More durable than Dyneema, weather-resistant, and much more affordable.
- Tarptent Double Rainbow – A lightweight, weather-resistant shelter that doesn’t cost a fortune and holds up better than Dyneema in rough conditions.
- The design allows for high volume pole architecture resulting in steeper walls
- High volume angle hub increases stability and strength while creating optimal livable space
Does Dyneema work for some hikers? Sure. If you’re ultralight-focused, hiking in low-abrasion environments, and willing to handle its quirks, it might be worth the trade-off.
But for most backpackers, a well-made silnylon or silpoly tent is the better investment—more durable, more versatile, and a whole lot cheaper.
Water Bladders – Great in Theory, Annoying in Reality

At first glance, hydration bladders seem like the perfect solution. Hands-free drinking, big capacity, and no need to stop and reach for a bottle. But after a few trips, the hassle starts outweighing the convenience.
Between surprise leaks, awkward refills, and extra weight, water bladders quickly turn into one of the most annoying pieces of gear in your pack.
The Refill Struggle and Surprise Leaks
If you’ve ever tried refilling a hydration bladder on the trail, you know how frustrating it can be.
Picture this: Your hiking buddy with a Smartwater bottle dips it into a stream, screws on their filter, and is back on the trail in 10 seconds. Meanwhile, you’re digging through your pack to pull out a half-empty bladder, trying not to spill the remaining water while holding it open. The whole process feels like wrestling a wet plastic bag.
And let’s talk about the leaks.
- One bad bite valve? Your sleeping bag is soaked.
- A loose cap? Now your backup layers are drenched.
- An accidental squeeze in your pack? Enjoy drinking from a puddle inside your dry bag.
Ever tried drying out a down quilt at camp? It’s an all-day project.
Bladders are also prone to air bubbles, suction issues, and freezing in cold weather. If the hose freezes, your entire hydration system is useless until it thaws.
Why Simple Bottles Work Better

Instead of dealing with leaks, weight, and endless cleaning, grab:
- 1L Smartwater Bottles – Lightweight, cheap, and perfect for use with a screw-on filter like the Sawyer Squeeze. Durable enough to last for months of hiking (on Amazon)
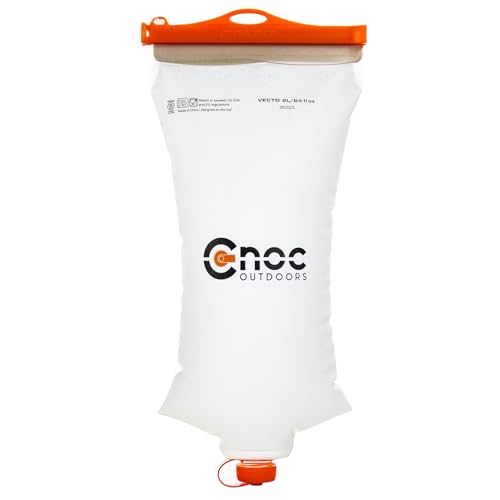
- CNOC Vecto 2L – A soft-sided water reservoir that folds flat when empty and makes refilling from streams effortless. It also doubles as a gravity filter bag (on Amazon)
A Smartwater bottle and a CNOC Vecto together weigh less than a full hydration bladder—while being easier to refill, clean, and store.
- The Vecto’s features include a dual opening design – slider sealed wide opening and standard 28mm soda bottle-style screw neck. The 28mm Vecto attaches to filters with a 28 mm thread, such as the…
👉 Upgrade your hydration setup: Check out the CNOC Vecto and Sawyer Squeeze for a lightweight, leak-free system that actually works.
- Lightweight, easy to use portable water filter removes harmful bacteria, protozoa, cysts, sediment, And 100% of microplastics; Perfect for outdoor adventures, travel, or emergency preparedness
- High-Performance 0.1 micron absolute inline filter fits in the palm of your hand and weighs just 2 ounces
New to backpacking? Don’t learn the hard way. Check out these beginner mistakes so you can hit the trail with confidence.
Pack Covers – Overpriced, Ineffective, and a Waste of Money
At first glance, a pack cover seems like a smart investment. It’s designed to keep your backpack dry in the rain, right?
In reality, pack covers are one of the most overrated pieces of backpacking gear. Not only do they fail to fully protect your pack, but they also add unnecessary cost, weight, and frustration.
If you’re still using a pack cover, you might want to reconsider.

Why Pack Covers Fail in Real Conditions
The biggest issue with pack covers? They don’t actually keep your gear dry.
1. Water Seeps in Through the Back Panel
Even if you have the most well-fitted, high-end pack cover, it only protects the front and sides of your pack.
The problem? Rain still gets in through the back panel—right where your shoulder straps, hip belt, and frame connect. Ever opened your pack to find damp clothes—even with a cover? That’s why.
2. Added Weight for Minimal Protection
Most pack covers weigh 3-6 ounces, which isn’t huge—but why carry extra weight for something that doesn’t work?
Instead of adding a semi-effective layer on the outside, a better approach is keeping water out from the inside.
A Pack Liner is the Smarter Choice
A pack liner is lighter, cheaper, and far more effective than a traditional pack cover.

Instead of covering your bag, a liner goes inside your pack, creating a waterproof barrier around your most important gear. Even if rain soaks your pack fabric, everything inside stays bone dry.
Best Pack Liner Options:
- Nylofume Pack Liners – Ultralight, highly durable, and completely waterproof. These are used by thru-hikers and weigh almost nothing (on Amazon)
- Trash Compactor Bags – Budget-friendly and nearly indestructible. Costs a few bucks and lasts for multiple trips (on Amazon)
- Six Moon Designs Pack Liner – A pricier, more structured option that’s great for extreme conditions (on Amazon)
- Keep your hiking gear dry and protected with the Six Moon Designs 50L Waterproof Roll Top Pack Liner, a travel essential perfect for any hiking backpack or camping adventure.
- Designed for seamless adaptability, this waterproof roll top bag fits effortlessly inside various backpacks. It’s the ideal choice for daypacks, travel backpacks, and rucking backpacks alike.
When a Pack Cover Might Be Useful
To be fair, pack covers aren’t completely useless.
If you’re expecting non-stop, heavy rain, a cover can help prevent your pack fabric from absorbing extra water weight.
The best approach? Use both.
Camp Shoes – Extra Weight for No Real Benefit

Why You Don’t Always Need Them
Camp shoes seem like a smart idea—until you actually carry them for a few trips.
Most hikers bring them for one reason: to let their feet breathe after a long day of hiking. And in theory, that makes sense. But in practice? They’re dead weight.
Think about it. You’ve been carrying an extra pair of shoes all day, just to wear them for maybe 30 minutes at camp. That’s a terrible weight-to-use ratio—especially when a fresh pair of socks and loosening your laces does the exact same thing.
And let’s talk about storage.
- Strapped to the outside of your pack? They’re bouncing around like an awkward set of wings.
- Stuffed inside? Now they’re taking up valuable space that could be used for food, insulation, or something that actually improves your trip.
If you’re trying to go lighter and ditch unnecessary weight, camp shoes should be one of the first things to go.
When Camp Shoes Might Be Worth It
That said, there are exceptions.
- Frequent water crossings? If you’re constantly wading through rivers, having a separate pair of lightweight shoes might make sense.
- Barefoot hikers? If you wear trail sandals (like the Luna Mono Winged Edition or Xero Z-Trails) all day, camp shoes can be a way to give your feet a break.
- Cold-weather backpacking? In winter conditions, insulated booties like the GooseFeet Gear Down Socks can keep your feet warm in camp.
But for 99% of three-season backpackers, camp shoes are just extra weight.
A Smarter Alternative for Dry Feet
If you really want dry, comfortable feet at camp—without carrying a whole extra pair of shoes—just do this instead:
- Bring an extra pair of insoles (Amazon). If your main pair gets soaked, swap them out for dry ones. This gives you the same fresh feeling without the bulk of camp shoes.
- Pack dedicated camp socks. Keep one dry pair just for camp and sleeping. When you get to camp, take off your wet socks, put on your warm, dry ones, and enjoy instant relief.

- Trim to Fit: Superfeet insoles are made to be trimmed to fit your shoes and boots; follow cutting instructions before use, and if you’re between sizes, size up and trim down to fit
- Medium to High Arch Support: Provides flexible support in a cushioned hiking insole made to fit well in hiking boots, trail shoes, and outdoor footwear
That’s it. Simple, lightweight, and effective.
Too Many Fire Backups – The “Prepper Overload” Mistake

You Don’t Need an Entire Fire-Starting Arsenal
Some Some hikers pack for the apocalypse—stormproof matches, a full-size Bic, a ferro rod, a backup lighter, and even a magnesium block. It’s like they expect to be stranded in the wilderness for weeks, desperately rubbing sticks together to stay alive.
Let’s be real: when was the last time you actually needed more than a single lighter?
Stormproof matches? Cool, but unnecessary. If conditions are so wet that a Bic won’t work, your kindling probably won’t light either. And if your only fire-starting method is a match, you’ll burn through half a pack just trying to get a damp twig to catch.
Ferro rods? Great for survival situations. If you’re in the middle of nowhere, completely out of fuel, and need an infinite spark source, sure—it makes sense. But on a regular backpacking trip? It’s overkill. You’re not filming Alone—you’re making coffee and boiling water.
And let’s not even get started on magnesium fire starters. If you’re shaving off metal just to get a spark, you’re working way too hard.
The Only Fire Setup You Actually Need
If you’re heading into the backcountry for a backpacking trip—not a bushcraft survival challenge—your fire-starting kit should be as simple as possible.
Here’s all you need:
- One Bic lighter. Cheap, reliable, and works 99% of the time. You can buy a pack of Bic lighters for a few bucks, and they’ll last an entire season.
- A mini Bic as a backup. If you really want redundancy, throw a Mini Bic in your emergency kit. It weighs nothing and takes up no space.
That’s it. No stress, no wasted pack weight.

If you’re really worried, toss in a few waterproof fire starters. They’re light, compact, and actually useful if your fuel is damp.
But carrying a full fire kit—stormproof matches, ferro rods, magnesium blocks, and a half-dozen lighters? You’re just adding weight for no reason.
- Includes 25 windproof and waterproof matches, 3 strikers and match case that can hold up to 40 matches
- Matches are easy to light, will burn up to 15 seconds each and will relight after being submerged in water
- Waterproof, durable ABS plastic case floats and keeps contents dry and protected; external, integrated, and replaceable striker for easy lighting
Think ultralight backpacking has to be expensive? Think again. You don’t need to drop thousands to cut weight from your pack. Check out my budget ultralight backpacking gear guide for affordable, lightweight gear that actually works.
Final Thoughts – Save Money, Save Weight, Hike Smarter
Backpacking is all about carrying what actually works. Every ounce in your pack should serve a purpose, and if a piece of gear is more hassle than it’s worth, it doesn’t belong on your back.
It’s easy to fall into the trap of thinking that expensive = better or that every hyped-up piece of gear is a must-have. But experience on the trail teaches a different lesson: the best gear isn’t always the lightest, the priciest, or the trendiest—it’s the gear that actually performs when you need it.

If you want to see a fully tested, ultralight setup that works in real-world backpacking, check out my ultralight backpacking gear list. It’s the exact gear I use to keep my pack weight low without sacrificing durability or comfort.
See you on the trail!
Join Our Community of Adventure Seekers!
Get the latest backpacking tips, gear guides, and trail inspiration sent directly to your inbox.
Sign up to start exploring!
Amazon and the Amazon logo are trademarks of Amazon.com, Inc. or its affiliates.


